
Microsoft Teams might not have been designed specifically for teletherapy, but it can get the job quite nicely in a pinch. Like, when other providers are being crushed by unprecedented amounts of traffic as most of the country's healthcare providers move to telehealth in response to COVID-19.
Teams offers robust video meeting features and runs on a super reliable Microsoft platform built with HIPAA-compliant technology. It also provides flexibility for clients, who can use Teams on Windows or Mac computers, as well as tablets and phones running Android or Apple operating systems. On most platforms they can choose between a downloaded application or a Web-based version.
The technology under Teams is HIPPA compliant, but to establish your HIPPA compliance, you or your organization must have an Office 365 license with Microsoft. An active Office 365 contract automatically provides you with a HIPPA-required Business Associate Agreement. And if you are already paying Microsoft for Office 365, that means you don't have to pay any more for your Teams-based teletherapy platform.
With an Office 365 contract and the accompanying BAA in place, it takes just a little work on the front end to set up a client for teletherapy sessions on Microsoft Teams.
NOTE: As long as telehealth-related HIPAA requirements remain relaxed by the federal government during the COVID-19 pandemic, you should not need to worry about securing a Business Associate Agreement in order to legally use Teams as your teletherapy platform. As a matter of fact, you should even be fine using the free version of Teams that Microsoft has made available to everyone. However, before you begin using Teams for teletherapy, you should confirm the current legal requirements regarding telemedicine platforms.
Unlocking the Full Teletherapy Potential of Microsoft Teams
You could take different approaches to using Microsoft Teams for teletherapy, but in this post we're going to walk through a systematic method that lets you leverage all of Team's features. This approach lets you create a Teams-based therapy environment for each client, where you can share files and web links with the client, as well as conduct video-chat therapy sessions, all in a private, safe online setting.
This approach does come with one caveat. Your Teams version and implementation has to allow guests from outside your organization to join internal teams. If you are using a work copy of Teams provided by your employer, you'll need to talk to your organization's Teams administrator to make sure Teams is set up to allow outside guests. If you are using a private copy of Teams, including the free version, this won't be a problem because Teams will allow you to include anyone as a team member or guest.
NOTE: The instructions presented in this tutorial assume you are using a business-licensed version of Teams included with Office 365. If you are using a private and/or free version of Teams, what you see may look a little different. Even if you are using the Office 365 version, you may see some differences resulting from the updates Microsoft has been making to Teams in response to its surge in during the COVID-19 pandemic.
Assuming Teams is set up to allow outside guests, here are the basic steps for delivering teletherapy to a client with Teams:
- Set up a new "team" in Teams for use only as a means of communicating with a specific client. We'll give that team a name that includes the name of the client, followed by the word Private.
- Add the client (and only that client) to the new team. This requires the client's email address and triggers an email to the client with an invitation to join the team.
- Alert the client to look for the email invitation to join the Team.
- Confirm that the client is able to register for the group and access the Teams application, either online or using a version installed on the client's computer.
- At the time of the appointment, go to the client-specific team, initiate a video meeting and invite the client to join the meeting.
Step 1: Setting up the Client's Private Team
To walk through these steps, let's set up a private Teams environment for a client named John Doe, whose email address is jdoe@gmail.com.
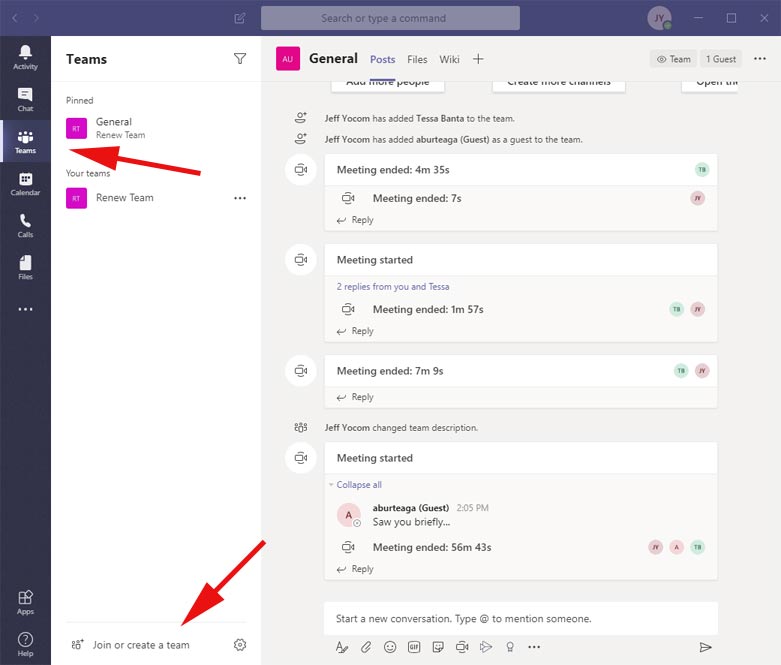
- With Teams open (either the web-based or locally installed version), click on the Teams button along the left edge of the window.
After you do, Teams will show a list of the teams you belong to, as shown below. At the bottom of the window, down below this list of Teams, you'll see a link saying Join or create a new team.
To create your new team, follow these steps.
- Click the Join or create a new team link.
- When Teams asks if you want to create a team or join a team, click Create team.
- When Teams asks if you want to build a team from scratch or create it based on an existing team, click Build a team from scratch.
- When Teams asks what kind of team will this be, click Private.
- In the Some quick details about your private team, enter this information
- Team name: John Doe - Private (You'll use the actual client's name, followed by - Private.
- Description: John's private therapy platform
- Click the Create button.
At this point, Teams will pause for a moment while it creates your team, then it will give a Nice work! message before inviting you to add members the the new private team.
Step 2: Adding the Client to the Private Team
Teams will display the box shown below to let you specify members for the team. The only person you want to add is the client, and you do that by entering the client's email.
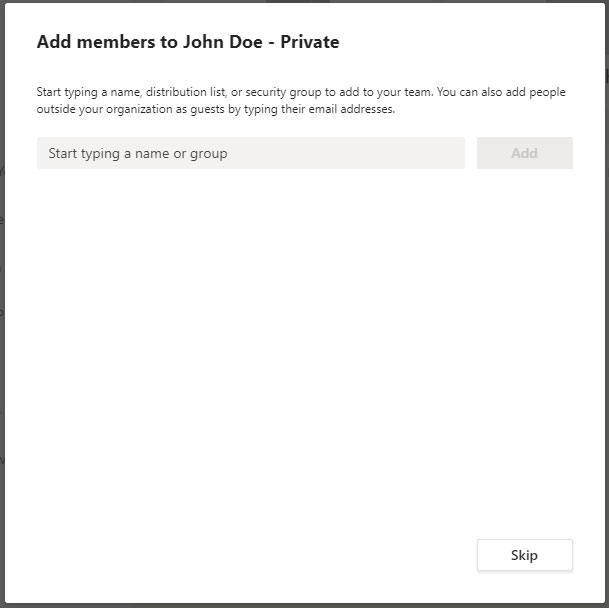
- In the text box that says Start typing a name or group, type jdoe@gmail.com. (or the actual email address for your client)
- When you see a drop-down command under the text box saying Add jdoe@gmail.com as a guest, click on that command.
At this point, Teams will convert the email address you entered into a member definition named jdoe (Guest), as shown below.
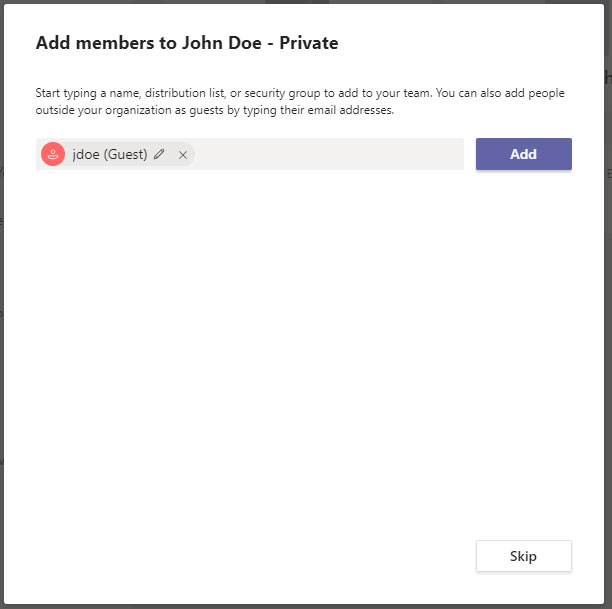
By default, Teams names the guest member definition with the part of the email address before the @ character. Because that part of the email address may or may not be meaningful, let's change the member definition name to reflect the client's actual name.
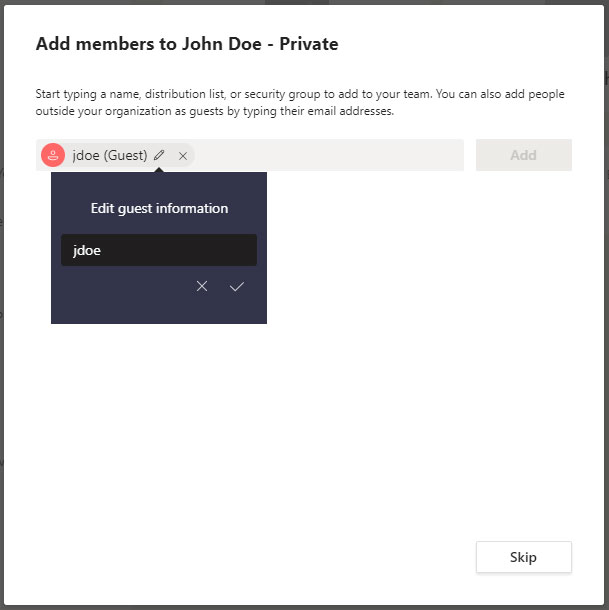
- Click on the pencil icon next to the name to edit the member definition.
- When a "Edit guest information" box opens under the member definition, it will display the name jdoe, as shown below. Delete that entry and enter John Doe (or the name of your actual client), then click the check mark below the modified name to save it.
- With the member definition now showing John Doe (Guest), click the purple Add button next to it. Teams will pause for a moment as it adds the new member. When it is finished, John Doe will be listed as a Guest in the Team.
- You are finished adding team members, so click the Close button.
You are finished creating the new team! Congratulations!
At this point, the team named John Doe - Private will appear on your list of Teams, which we looked at way back in the first figure of this article.
Behind the scenes, Microsoft Teams has sent an email to the client, letting them know that they have been invited to join the team. Below is an example of the email they would receive. As you can see, this email comes from Microsoft Teams, not Renew Counseling. If we don't tell the client to look for this email, they are likely to ignore it or suspect that it is part of some scam designed to steal their personal information.
Which brings us to our next step...

Step 3: Alert the Client to Look for the Email Invitation
You could always tell the client to look for the email during a phone conversation, but to be safe, I suggest sending them a text or an email from your Renew Counseling email account. Even if you tell them verbally, sending a written reminder lets you provide more information about what the client can expect when they click on the link in the email, and how things are going to work at the time of their teletherapy session.
Here is some text you can feel free to cut and paste right into an email or text message to the client:
This message provides important information about your upcoming teletherapy appointment at Apex Counseling. You should have recently received an email from “Microsoft Teams” stating that you have been added as a guest to a "Team" that bears your name. This "Team" is actually a private online group where you will receive teletherapy, built on the Microsoft Teams platform.

To prepare for your teletherapy session, click the “Open Microsoft Teams” button in the email and then follow the online steps to launch and log into Microsoft Teams. You will have the option of using the Teams Web app or the standalone Teams application if it is installed on your computer or device. When logging into the Microsoft Teams application, You may need to create a Microsoft.com account if you do not already have one. You may also choose to download and install the Teams application on your computer or device.

At the time of your appointment, please launch Microsoft Teams and wait for your therapist to “call” you into a video meeting.
Step 4: Initiate the Video Therapy Session
When it is time for the therapy session, just open Teams, click on the Teams icon, and then click on the name of the team you created for the client. After you do, Teams will show the work space for that team, at the bottom of which you will see a conversation toolbar displaying the icons shown below. The camera icon, which shows the label "Meet now" if you hover over is what you use to start a video meeting.

Click this icon to display a video preview window, as shown below. Now is the time to make sure your camera is turned on, adjust your camera angle and brush your hair. When you are ready to actually enter the video meeting, click the purple Meet now button near the bottom of the video preview panel.

When you enter the session your Teams window should like the one shown below. Notice that there is a list of the team members, you and the client, along the right side of the screen. When it's time to begin the session, you should invite the client to join the meeting by following these steps.
- Hold your mouse over the client's name. A grey background will appear around the name and a menu with three dots will appear next to it.
- Click the three dots, and when Teams displays the command Ask to join, click on it.
Teams will begin trying to "call" the client, whose name will appear under the list of current attendees. The client should either answer, thereby joining the video meeting, or you will briefly see a message next to their name saying that they are unavailable . "Unavailable" means that the client is not logged into Teams, or that they are but did not respond to the call. If they are unavailable more than a few minutes into the scheduled appointment, you might want to check in with them via a phone call or text.
When the client enters the meeting, your video feed will shrink into the bottom-right corner of the window, and you will see the client's video feed in the main part of the window. The postage stamp of your video will actually disappear during the session, but you can summon it by hovering your mouse above that part of the window.
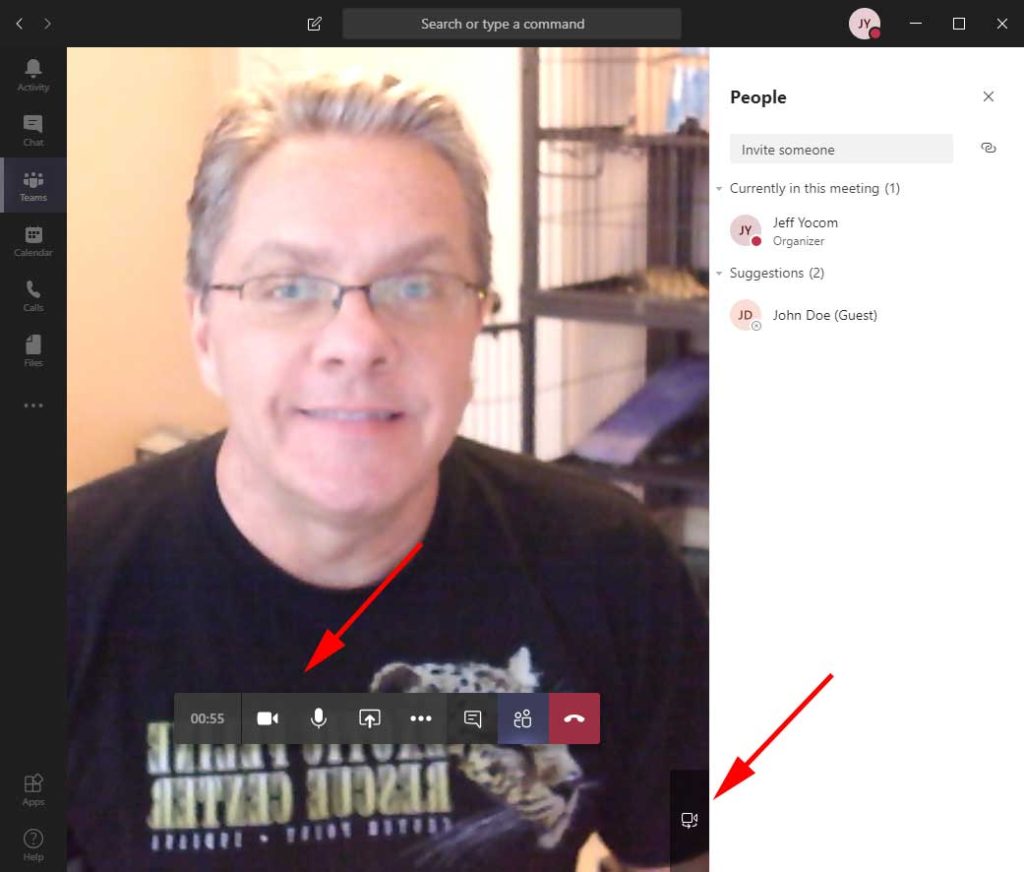
During the video meeting, you will probably need to use the toolbar towards the bottom of the video window, highlighted above with a red arrow. This toolbar will fade from view during the meeting, but you can summon it at any time by hovering your mouse over the video meeting window. Here's what the toolbar items do.
- Running clock: Shows the current duration of the meeting since start
- Camera: Toggles your camera on and off
- Microphone: Mutes your mic
- Square screen around upward arrow: Share a screen or application window in the video chat.
- Three dots: Displays the menu shown below, which you might need if you are having sound or video problems. In such a case, go to Show device settings to make sure Teams is set up to use the correct microphone and speaker.
- Dialog box: Opens and closes a text chat pane along the right side of the window. This is useful if you or the client are having video or audio problems.
- Two people: Opens and closes the People pane along the right side of window, as shown above. You'll probably want to close it once the session starts.
- Red phone: hangs up, removing you from the video meeting when you are finished.
Also, notice the small camera icon/button that appears in in the bottom-right corner of the video pane. This button switches your camera to another one if more than one are installed on your computer. If your video is not working, clicking on this button can sometimes solve the problem.
Using Advanced Features for Teletherapy
In addition to these basic tools for participating in a video therapy session, Teams provides several advanced features that you can use to enhance a client's online therapy environment. These features include screen sharing, file sharing, and web resource cataloging. I'll explain these features in a future post.